In this post, i will explain you the basics of logstash. This tool is a powerfull gateway that can apply transformation during the process of a message. It can listen to a port and wait for a message or connect to a service to extract the data as an ETL.
I will show you how to create a small logstash port listener and forward the data to elasticsearch.
First to download logstash please go to this page: Download logstash.
Either download the .deb file or rpm file for an easy and quick install or the compressed file for Windows, Linux or MacOS.
The folder contains at the root folder the binary file “logstash” or “logstash.exe” and a folder conf containing the “pipeline.yml” and “logstash.yml” configuration.
- Create a logstash config file into the conf folder and name the file example.conf
- With the configuration example, logstash will listen for the same service at the same on the HTTP port 5891 and on the beats protocol 5947 and will forward the data to Elastic on the url http://localhost:9200. Logstash will create every day an index with this name convention tomcat-local-yyyy-mm-dd
#Logstash configuration file
#Log messages can be received using http on port 5891
# or
#Log messages can be received using beats on port 5947
input {
http {
port => 5891
codec => json
}
beats {
port => 5947
codec => json
}
}
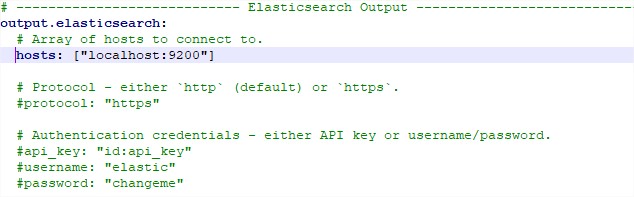
Data is sent to Elasticsearch to port 9200
output {
elasticsearch { hosts => ["localhost:9200"]
index => "tomcat-local-%{+yyyy-MM-dd}"
}
}
- Specify to logstash to take the config file example.conf in consideration
- Add the config file into the pipeline.yml file
- Give a unique pipeline id to this listener worker group
- Point to the configuration file example.conf
- Specify how many concurent thread will manage the data inputs that will be processed at the same time. (3 by default if pipeline.workers is not specified)
- pipeline.id: example
   path.config: "C:\logstash-8.1\conf\example.conf"
   pipeline.workers: 3
Start logstash and ensure that the the ports are listening and send a json example to see if logstash will forward it to elasticsearch.
Now i will show you how to connect to a msql DB and sends table rows to Elastic
- The input section will use the mysql connector library, connect to mysql, run the SELECT statement every 5 minutes, the filter part will create field id, and remove 3 other fields before sending the data to elastic. The example also stores the latest value processed to be sure that the rows wont be processed twice.
input {
  jdbc {
  jdbc_driver_library => "C:\mysql-connector\mysql-connector-java-8.0.16.jar"
  jdbc_driver_class => "com.mysql.jdbc.Driver"
  jdbc_connection_string => "jdbc:mysql://127.0.0.1:3306/databaseexample"
  jdbc_user => USER_MYSQL
  jdbc_password => PASSWORD_MYSQL
  jdbc_paging_enabled => true
  use_column_value => true
  tracking_column_type => "numeric"
  schedule => "*/5 * * * * *"
 statement =>"SELECT * FROM example_table WHERE last_modified_time >:sql_last_value"
 use_column_value =>true
  tracking_column =>last_modified_time
  tracking_column_type => "timestamp"
  }
}

 filter { mutate { copy => { "id" => "[@metadata][_id]"}
  remove_field => ["id", "@version", "unix_ts_in_secs"]
  }
}
output {
  elasticsearch {
   elasticsearch { hosts => ["localhost:9200"]
   index => "db-local-%{+yyyy-MM-dd}"
   document_id => "%{[@metadata][_id]}"
  }
}